

"Hello to those of you visiting from Made by Rae! I'm Steffanie from sew grown. I'm so glad to be sharing this super fun tutorial with you and participating in Celebrate the Boy! I have 2 boys of my own so this month is dear to my heart!
I'm a homeschooling mom to 3 small children and love to sew for my boys any chance I get. It's always more challenging but I've found that every project is more original and rewarding! Today I will be sharing the Scavenger Bag tutorial with you. I'm so glad to pass this one on! It's easy and my boys LOVE their Scavenger Bags! My boys, like most, love to collect trinkets and explore the backyard for treasures. This bag gives them the perfect place to store their goodies while keeping their hands free. It also makes a great library bag! I hope you enjoy and thanks Rae for another awesome month dedicated to our little guys!"
Here are a few shots and you can view the original post here if you are interested in learning more about these bags.

This was obviously not a planned photo shoot but I wanted to show how this bag fits my little guy. All I can say is he dressed himself and sometimes that's good enough for me!

 |
| The Tee for Two skull shirt is still going strong |
 |
| I dont' think that's going to fit! |

What you will need:
- 1/2 yard medium to heavy weight fabric for outer bag and handles.
- 1/2 yard medium to heavy weight fabric for lining.
- 8" of 1/2" wide elastic.
- Maxi piping. (approximately 28").
- Bolt Snap or any purse snap of choice.
- D ring (any size of choice)
- 2 sheets 8.5" X11" printer paper
Step 1: Create your pattern.
To make your pattern you will take 1 sheet of 8.5" by 11" printer paper and fold it in-half long ways then cut off the raw edge corner at a curve. You can trace the bottom of a bowl if you need help making a curve. This will be the top flap of the bag.

Next fold the straight edge of the flap over 2.5" from the bottom and place the flap with the folded edge tucked under on top of your second 8.5" X 11" printer paper. Draw a straight line along the curved edge and cut. This will give you a 2.5" strip pattern piece for the sides and bottom of your bag. The remaining square will be the pattern for the body of the bag and bag liner.

Step 2: Cut out fabric for outer body and lining.
Using your prepared pattern cut out fabric.

Step 3:
Cut fabric for pocket and strap.
You will need to cut 1 strip of fabric 12" X 5" from your outer fabric for the pocket and 2 strips 2" X 31" for the strap. 1 out of lining fabric and one out of body fabric.


Step 5: Add piping and sew top flap.
Pin piping to the right side of the outer fabric flap raw edges together. Sew along piping seam all the way around the top flap leaving the back straight edge without piping. Pin lining flap and outer flap right sides together and sew around leaving straight edge open. Flip and iron flat.
Note: It's best to sew on the top seam created when you attached your piping to the outer fabric. This will insure that no extra seams will show when the flap is flipped.


Step 6: Create and add pocket and embellishments.
Fold over top edge 1/4" and then again 3/4". Sew along folded edge using 1/8" seam allowance. This will create the pocket for your elastic.

Attach a safety pin to the end of elastic and feed it through the pocket.


Make sure you have enough gathering to make a good stretchy pocket then pin to front outer bag wrong side of pocket facing right side of bag. Sew along 3 outer sides using 1/8" seam allowance. You may need to trim away some of the elastic depending on how your fabric gathers.


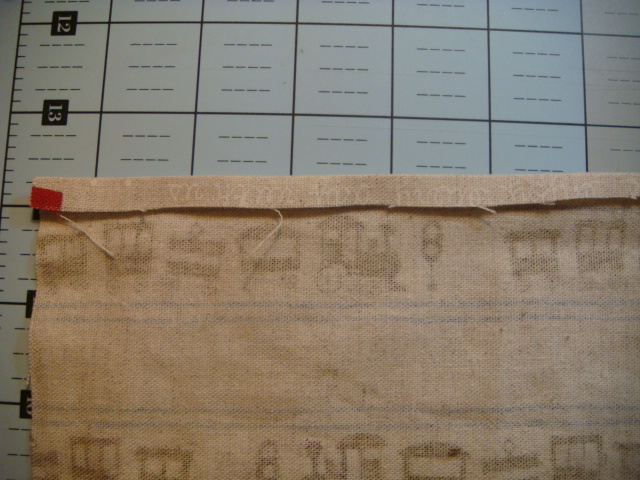
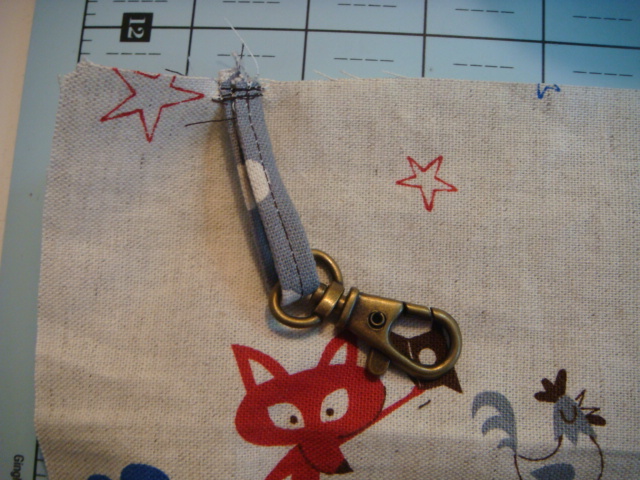
To make tabs and loops you will fold scrap fabric in the length and width of your choice in half, unfold then fold in raw edge sides towards the fold line, fold in half again, then top stitch along both sides for tabs or one side for loops.


Feed D rings or clasps in the loop and attach loops to top of bag on the right side raw edges aligned.

For tab pockets attach to right side of bag along the left and right side of prepared fabric leaving the top and bottom open to slide things in.


Step 7: Prepare outer bag and lining. You will us 1/2" seam allowance unless stated otherwise.
Pin side panels to front with right sides together and stitch. Next pin back of bag to one side right sides together and stitch. Fold right sides together and stitch last side together.


Make sure you center the bottom panel so you will have the 1/2" seam allowances available on the sides.


Repeat step 7 for bag lining.
Step 8: Prepare and attach straps.
With right sides together sew along each long side using 1/4" seam allowance and leaving the top and bottom open.


Attach a safety pin to the outer fabric on one end and feed through the handle turning it right side out. Iron flat when done.

Top stitch using 1/8" seam allowance.
Turn the bag right side out and with right sides together attach straps to sides using 1/4" seam allowance. Reinforce stitch a few time to give it extra strength.

Step 9: Add flap.
With right side together pin flap to the back on the bag and stitch using 1/4" seam allowance.

Step 10: Attach lining to outer bag.
With the lining of the bag wrong side out and the outer bag right side out place the outer bag inside the lining. This will put them right sides together. Tuck the flap and straps inside the lining. All you should see at this point is the wrong side of the lining. Stitch around the top using 1/4" seam allowance and leaving a 3" opening along the back side. Flip right side out and finish by top stitching around the entire top using 1/8" seam allowance.


Congratulations! Your Finished!


That fabric is gorgeous! Love the bag and your tutorial is brilliant! x
ReplyDeleteWhat a bag! I love it and want one for me too!
ReplyDeleteWow, what is that train fabric? It is amazing. Can we buy it somewhere?
ReplyDeletethanks for the great tutorial.
ditto on the train fabric, where did you get that?????
ReplyDeleteI'd love to know where you got the train fabric too because my son would LOVE it!
ReplyDeleteThis is an amazing bag- great tutorial!
erica @ http://bisforboycreations.blogspot.com/
This looks fabulous - I want to put away everything I'm working on and make a pair for my boys immediately!! Love the fabric too - maybe I need to go shopping first?
ReplyDeleteIt's gorgeous. I love it. I might have some left over train fabric from the backpack I made my son. It's Trefle isn't it? I love it. Thanks for sharing.
ReplyDeleteThis is fabulous! LOVE that fabric too! Thanks so much for sharing AND for being a part of the "THE BOY" fun, it's how I found you!
ReplyDeleteGosh, I love this! Beautiful bag.
ReplyDeleteWhat a cute, cute bag!! I linked to your tutorial over at Craft Gossip Sewing:
ReplyDeletehttp://sewing.craftgossip.com/tutorial-scavenger-bag-to-hold-kids-treasures/2011/02/21/
--Anne
Awesome tutorial, really, really cute bag - I am planning to make one for me!
ReplyDeletePlease, please make PDF versions so people can save them out for the future and print them out at their leisure. My bookmarks are getting overloaded with projects I want to try.
great tutorial, thankyou. Before I realized what you were doing with the sunglasses loop it looked to me like you were giving the bear a modesty towel :)
ReplyDeleteWhat a cute bag, my toddler would LOVE it! I think you'd like all the project tutorials over at www.WeAllSew.com, have you visited yet?
ReplyDeleteVery cute bag, I love all the details. And I kind of like the idea of the sunglasses loop being a modesty towel as previously mentioned.
ReplyDeleteThanks for the tutorial! I made one for my older son and I am really excited for spring when we can use it... I think he will really like having it when we go out to explore. I blogged about it if you would like to see (http://shesaserging.wordpress.com/2011/02/28/scavenger-hunt-bag/)
ReplyDeleteOk, I LOVE LOVE LOVE this! I'm totally making one for my son. His birthday is in May and I can't wait! After searching the whole entire day, yes, the whole day, every free second has been in search of this fabric! I have finally found the fabric so I thought I would save you a whole day of searching. It is on sale right now over at super buzzy, it is called Petite Ecole - Enjoy Every Day. It is an 'All in One' in the transportation section.
ReplyDeletehttp://superbuzzy.com/index.php?main_page=product_info&cPath=88_190&products_id=6302
Hello
ReplyDeleteI liked your blog so much ... have many interesting things to do. Thanks.
kisses in the heart
Nena
http://labottegadinena.blogspot.com/
I liked your blog so much ... have many interesting things to do. Thanks.\
ReplyDeleteAnytime you come to our site to buy Cheapest WOW Gold , you can contact with our live help. Just click the “Live Help” on the Cheap WOW Gold page, our professional WOW Gold EU customer server will reply you. Through this way, you can ask anything about our site about World of Warcraft, we will try our best to let you satisfied with us.
When a corporation has been using a promotional item too normally and the products begins acquiring the commonplace reaction from recipients, it really is time to modify that product. This really is for the reason that the adverse effects related with a item that has been applied often in the trade show events could possibly be detrimental to any promotional usb campaign. At trade shows, quite a few organizations are present to promote their organizations and if they all do so with the exact same items, by the finish from the day there won't be a great deal that's achieved. Convention attendants could possibly even leave the items behind therefore rendering the promo inefficacious.
ReplyDeleteI just finished this bag. Took me four hours because I am a novice seamstress but I think my son will love it when he sees it in seven hours! I used a vinyl type tablecloth fabric for the liner. The liner gave me trouble when I was trying to pull it through (duh, rookie, lots of layers means lots of tugging through teenie hole!)but I love it and I know he will love it. Will try to send photos soon. I am hoping to share the pattern with other novices who think they CAN'T make anything useful! thanks for sharing.
ReplyDeleteThis comment has been removed by the author.
ReplyDeleteThaks to share this well detailed tutorial. Otherwise I would not have attempted to make this bag. Just finished it, I think it turned out well...I´m a hungarian mother living in Spain and just sumbled upon of your site by looking for boys bag.Thaks again.
ReplyDeleteWow! Promotional bags is very nice and looking good. It's bag very useful and attractive. Thanks for sharing nice blog.........
ReplyDeletehis was obviously not a planned photo shoot but I wanted to show how this bag fits my little guy. All I can say is he dressed himself and sometimes that's good enough for me!Buy LOL Elo Boost
ReplyDeleteBuy League of Legends Coaching
Just wanted to say thank you for this amazing tutorial and pattern!! I am just getting into sewing again and needed a tote for my nephew for his "spy kit" and this is perfect for all his gadgets!! This 5 year old LOVES assessories!! LOL and this is going to be awesome! Your directions were so easy to follow (I am such a beginner!!) and it was fun to make!!! You have provided me with the best Christmas present... Right next to the spy wrist walkie talkies!! A million Thanks!!! Happy Holidays!
ReplyDelete