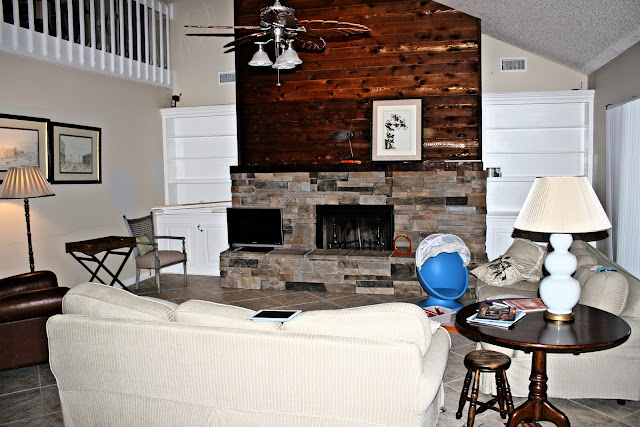
HOME ABOUT ME PATTERNS/TUTORIALS FEATURED CONTACT ME

Tuesday, August 30, 2011

Homeschool Library Phase One

The room is finally coming together!  There are still a ton of little things to finish and I have to decorate but I wanted to let you have a peek out how it's coming along. 


Here is the before!


The bookcases are the Billy Bookcases from IKEA.  These are super inexpensive and I love all the option you can choose from!  I will be adding cabinet doors to the bottom of the stand alone unit to hide some of our messy homeschool supplies and the magazine racks are perfect for displaying books for the kids to see and hopefully strike an interest. 


We had a carpenter come in and add crown molding to the top of the bookcases, a 1X4 along the bottom and shoe molding to tie it in with the baseboards.  We were updating all of the casings and baseboards in this room anyway so I had it built-in to the baseboards and chair rail but you can just do a quick up grade with crown and still get a great look.  I also decided to fill all the excess shelf holes and paint the bookcases so they matched the trim work.  I chose the window and door casing style to give the house a cottage look.  The 7" baseboards with short ceilings also help add that cottage charm.


The windows need to be replaced but that won't be happening this year so I painted the black framing white to match the trim.  It doesn't look great if the shades are up but we don't lift these shades ever so it was a perfect solution for now.  The bamboo shades are from Lowes and I love the filtered light!  I will be adding drapes for privacy and comfort. 


My wonderful husband built the desk for me.  This was so easy!  It's just a piece of oak plywood and to finish the edge we used left over baseboard cap.  When flipped upside down it made the perfect finishing touch.  The desk was put in to hide the air return but is now my favorite part of the room!  It gives the kids a place for writing lessons and me a place to prepare lesson plans. 


Here are a few other Billy Bookcase inspirations.

This is a photo from Tricia at home made happy.  This is actually one of my favorite blogs!  She has such beautiful taste and is so inspiring.  She also homeschools six beautiful children!  You need to head over and check out her home tour!


If you head over to Maillardville Manor you can read a tutorial on how to create this bookcase using the Billy bookcases.  She also has an amazing home tour! 


What do you think so far?  Pin It

Tuesday, August 23, 2011

Party dress.

Here is the dress I made for Madeline's first birthday.


I added a little silk flower headband to match that she surprisingly kept on most of the time. It was super easy to make. I rolled folded strips of silk to make the flowers and glued them to a bow of tulle.  I glued the tulle to a beaded strip of trip and then attached elastic to the trim.  It took about 10 minutes and totally made the outfit.


 I love this color pink on her! I made the ruffles one row shorter that I had originally planned because even though she is walking a little, she mostly still crawls. The good news is the bodice is a tad bit big so I think I will be able to add the 4th ruffle and she can get one more wear out of it in the Spring.  I used invisible snaps to close the back.  They are so much easier than buttons and look just as good!


It is 100% silk. The top fabric came pre-quilted and the bottom is raw silk.  There is also a layer of brown tulle under each ruffle to add extra poof. I was all about the poof with this one! I started writing a tutorial but I decided not to torture you! This thing was an absolute pain!


What do you think?  Is it worthy of a princess on her first birthday? 

Happy Sewing! Pin It

Wednesday, August 17, 2011

Family tradition

Sorry it's been so long! Things are so busy and I've been too wiped out at the days end to share any of it with you. I have been planning our homeschool year. Even though we have been doing school, it's been selective because we have had so much going on. We plan to be back to full time starting September 5th. I have also been working on putting together our homeschool library. The carpenter comes Monday so that should be ready to show you next week. I'm so excited about it! The room is turning out beautiful! It will be filled with as many bookcases as I can fit, a family game table, some super comfy reading chairs, and some bean bag chairs so the kids can lounge during reading time.

We also celebrated Madeline's first birthday. Her party is not until this weekend but I did take her on her birthday to a very special place. When I was young my mother would take me to the doll shop and let me pick out a special doll. It was such a nice treat and I still have those special dolls. I decided to start this tradition with Madeline. Every year on her birthday we will go to the doll shop and let her pick out a doll. I think family traditions are so important!

Here she is at the doll shop. 


I found the Pottery Barn Kids Pram at consignment. Score!


Now it's time to start building bookcases and planning her party. We will also be celebrating my fathers birthday this weekend and will have lots of family visiting. God is so good!

Do you have any birthday traditions for your wee ones? Pin It

Friday, August 5, 2011

Cedar Fireplace and House Photos

I have been really hesitant to share house photos with you because the house is such a mess but then last week when I was searching the Internet working on some design ideas for the family room and trying to find a solution for our massive, incredibly ugly fireplace, I remembered that sharing is what blogging is all about.   So here it is!


Our house was built in 1986 and the owners who bought the house during the major house boom did some work updating the place but it still has a long way to go.  This fireplace is all rough cedar.  The photos don't really show how bad the wood actually looks.  It was originally, and if you look at the top still is, very orange and if you touch it you will end up with about 30 splinters in your hand.  I stained the bottom with a walnut stain hoping that would update it a bit but it only made it worse!  It turned black in spots and wouldn't take stain at all in others.  Why I didn't notice this before staining half the fireplace I'm not sure. 


When we moved in pictures were hung where there were nails to get them off the floor and so far all I've done to this room is paint the built-ins and I had the handy man put crown molding along the top.  The walls will be painted the gray/blue you see smudged on the wall.  It is Ice Cap by Benjamin Moore.


The plan right now is to try and faux paint all the wood planks on the fireplace similar to how this chair was painted and have a more up to date mantel build.  If the paint doesn't look good we can try to lay thin wood floors over the top.  It's tricky because the built-ins are built up to the paneling on the sides and would need to be removed in order to completely replace the wood.  That is not something in the budget right now!  We have to work with what we've got since there is a lot more house that needs to be updated after this room!


Unfortunately vertical blinds didn't make the 80's comeback.  I will be making linen drapes in a neutral color that will have a reverse pleat and will be lined and padded so they hang just to the tile and pile nicely together without looking bulky.  They will also have hand sewn rings attached to make closing easy. 

The ceiling is popcorn and has a lot of damage so the carpenter will be laying tongue and groove pine on the ceiling that will be painted white as well as a couple of beams.  I really like the traditional cottage look!  The drapes will then be hung 2 inchesbelow the ceiling to add some balance to this wall.  The fan will be replaced with a large chandelier.  The hubby is not happy about that one!


My wonderful husband will be redoing the casings on all the doors and windows in this style.


He is also adding wainscoting to the room that will look similar to this without the picture shelf. 


Unfortunately we don't have a lot of time to worry about remodeling so these projects take a VERY long time but I will show you updates as things move along.  Here are some of my favorite decorating inspirational pics in the meantime. 

You can find the source by clicking on the photo.


Are you working on any house projects? Pin It

Monday, August 1, 2011

Anthropologie Rediscovered Flatware "A mini Tutorial".

This weekend I was browsing the online Anthropologie catalog and was so excited to see their new Rediscovered Flatware!


I was excited to find this because I have been collecting vintage silver and silver plated flatware for awhile now. That means my idea is in style! Yea! I started collecting several months ago after I became feed up with replacing full sets because we would loose most of the forks. I was also never able to find a set that wasn't bulky and heavy. I had a few vintage silver forks in our drawer from my childhood that I loved because they were light and thin and had sharp tips which made eating much more enjoyable so I decided that was the way to go.  I originally went looking for a full matching set for our every day use but the cost was too high.  That's when I decided to mix it up!  It's a lot more fun to collect them that way and a drawer full of silver makes hosting Holiday dinners and showers breeze.  It's a show stopper when set up at the table! 

These actually look very light and silver in person like Anthropologie's.  I just couldn't get a good photo.


I care for my silver by throwing it in the dishwasher and then tossing it back in the drawer. 


My only concern was how the hubby was going to respond when I finally replaced all the "old" flatware with "older" flatware. I started slow because it took me awhile to find enough to supply our needs. I began to notice however that he started to choose the vintage over the modern flatware. At first I thought it was because that was all that was clean but it turns out he appreciates the functionality of vintage flatware as much as I do.

If your interested in starting your own collection keep a look out at thrift shoppes, antique markets, and garage sales. The odd pieces are usually a really great price! Buy a bottle of Tarn-X from your local grocer, find a container you can fully submerge your silver in, get some disposable tongs and a pair of gloves, dunk, wipe, wash and your done!


Anthro's cost $36.00 plus shipping. My cost with the Tarnex is about $10.00 per 5 piece set.


Anyone else a lover of vintage silver?  Oh, and Antropologie too?

Pin It