HOME ABOUT ME PATTERNS/TUTORIALS FEATURED CONTACT ME

Friday, May 27, 2011

Baby Sunsuit Pattern Remix

Hi everyone!  If you are visiting from Me Sew Crazy welcome!

Today I'm guest posting this Pattern Remix over at Me Sew Crazy as part of her super fun Pattern Remix month!  The original pattern is FREE baby sunsuit tutorial by Rae over at Made By Rae.

The hat is a new pattern I'm working on that will be available for free hopefully by next week.  It still needs a little reworking but it was so fun to watch her crawl around the garden wearing this hat.  I couldn't believe she kept it on!!

I can't wait to show you how cute it looks in patterned fabric!  The secret is a stiff big brim.


So head over to Me Sew Crazy for more photos and a mini tutorial.  Pin It

Sunday, May 22, 2011

Clasp Clutch PDF Sewing Pattern


$5.00

Add to Cart
                                                                                                                                                     
This is an instant download PDF Pattern.

This pattern will be available for instant download directly after you have made payment unless you pay with eCheck which can take up to 5-7 business days.  After you have made payment using pay-pal click on the "complete your purchase" button for instant download.   You will also receive an e-mail shortly after payment is received with the attached pdf pattern. 


Details
This is a beginner to intermediate sewing pattern.  It looks intimidating but I promise it's super easy and all of your friends will be impressed!  These also make the best gifts!  This pattern is for personal use only.  If you are interested in selling these clutches please contact me for a license to sell agreement.  I will be offering them at no charge. 

Finished demensions of the clutch are approximetely 5X10" for the large and 5X8" for the small. 


Supplies needed
2 fat quarters  One for outer fabric and one for lining
Fat quarter size scrap of quilt batting
Fat quarter size scrap of fusible interfacing
E6000 adhesive Can be found at Wal-mart, Joanne fabrics, Michaels, Hobby Lobby, or online
Clutch clasp   I  provide links with the pattern for purchasing clasps at the most affordable price online


The pattern includes
Detailed step-by-step instructions
Detailed color photographs
2 pattern pieces for making a small and large clutch
Tips on where to buy supplies at the lowest cost


Other inspirations
Valentine Hipster Clutch
Clutch Giveaway
Antique Brass Clasp Clutch

Please let me know if you have any questions!


Pin It

Tuesday, May 17, 2011

Pattern Remix @ Me Sew Crazy

Hi everyone!  I'm so excited to share with you the pattern remix that is going on over at Me Sew Crazy!!!!


Jessica has a fantastic blog full of great tutorials and you have to check out her Friday Sew Crazy Features!  Her taste is impeccable!  Here is a peak at of few of my favorite Me Sew Crazy tutorials.


So head over now and catch up on the great Pattern Remix ideas and tutorials!  Pin It

Monday, May 16, 2011

Butterfly garden

Here is a picture of our new butterfly and humming bird garden.  I wish the pictures showed it off a little better.  Pics just never do a garden justice!


It looks like a simple enough project but it was actually HORRIBLE!  The bed is really large and under the first layer of sand and weeds was a 4" deep layer of rocks.  It took me about 10 hours over the weekend to shovel them out and hall them away.  Under the rocks was all sand so I had to remove another 5" deep layer of sand and fill it back up with compost soil.  I also dug holes 2X the size of my plants root system and added compost to the holes.  After all the plants were put in I put down weed liner then topped it off with pine bark.  The fountain only needed a little work to get it running.  We had an old pump and added the spray attachment, and with a quick wire fix and drain attachment it was ready to go. 

Before:


I found the rocks to line the bed buried throughout our property.  Score!  That however was another miserable task!  A few were toward the surface which is how I figured out they were there but the majority of them were buried pretty deep and had roots growing over the top of them.  They were also in a straight line down the opposite side of the property so I had to carry them over as I dug them up.  It was still a lot less painful than having to pay for them however!

I chose plants that attract Humming Birds and Butterflys that I've grown in the past and know from experience have long blooming seasons and grow into attractive plants in our area.  Each side mirrors the other with my favorite antique rose the Louis Philippe in the center.  This rose blooms almost all year in our area and is so beautiful and dainty.  The topiary trees are Tibouchina Standard or "Glory Tree".  They have beautiful sage green velvet leaves and rich purple flowers that bloom in our area most of the year as well.  They will also get bushy on top and add a little shade for the Hydrangea.  The Hydrangea won't attract butteflys but will give nice cut flowers for the house.  The rest consists of Agapanthas, Buddleia or Butterfly Bush in white, Purple Salvia, Red Porterweed, Stokes Aster, Gaura or "Pink Cloud" and Parsley to attract the caterpillars and for making tabbouleh. 

Glory in tree form


I hung a hummingbird feeder for extra nourishment for our friendly little birds.  They are so fun to watch with the kids! 

We also added a little southern charm "ferns" to our porch which is were I'm headed to rest!  What happened to the days when you woke up after a hard days work in the yard and felt sore but good?  I can barely move and there is nothing good going on with this body right now! Yikes!  Do you know what I'm talking about???


Next project: Make that fence in the background look a little nicer;)

Pin It

Tuesday, May 10, 2011

Anthropologie look-a-like tank tutorial

I finished it!  Here is the tutorial on how to make a simple knit tank top and if you choose embellish it to get that Anthropologie look.  You can whip one of these up in under an hour with less than a yard of fabric!  The embellishing is up to you.  I listed instructions on how to make knit flowers and gathered straps but the possibilities are endless! 

Please join the sew grown flickr group to show off what you create.  I would love to see it!

Happy Sewing! 


Things to know:
The pattern for this tank top is created by tracing an existing tank top and when using knits it's best to use a ballpoint needle.  I use an 80/12 Jersey Ball Point.

Step1:  Create pattern.
Trace an existing tank top onto your knit fabric.  You do this by first folding the knit fabric by the needed width then fold the tank top in half and place the inside fold of the tank on the fold of the fabric.  Make sure the stretch of the knit is running side to side not up and down then tuck any extended back parts under.  Repeat for the back and cut out front and back pieces.  Make sure you add seam allowances.  I used 1/4" seam allowances. 


Step 2:  Sew front and back together.
With rights sides together sew front to back at shoulder seam and sides.  Finish seams with serger or zig zag stitch.  Iron seam allowance to the back. 


Step 3:  Measure for neck and arm trim.
Turn shirt right side out and measure the full circumference of the neck and one arm hole.  Cut a fabric strip 1" wide by the circumference of the neck plus 1" and 2 strips of knit 1" wide the circumference of the arm hole plus 1".    Make sure the stretch of the knit is running with the length of the strips. 


Step 4:  Prepare neck and arm trim.
With right sides together sew ends using 1/2" seam allowance.  Iron open seam allowance.  Next fold the fabric strips in half right sides together and iron.


I know, my quilt block is gross, but I'm attached.

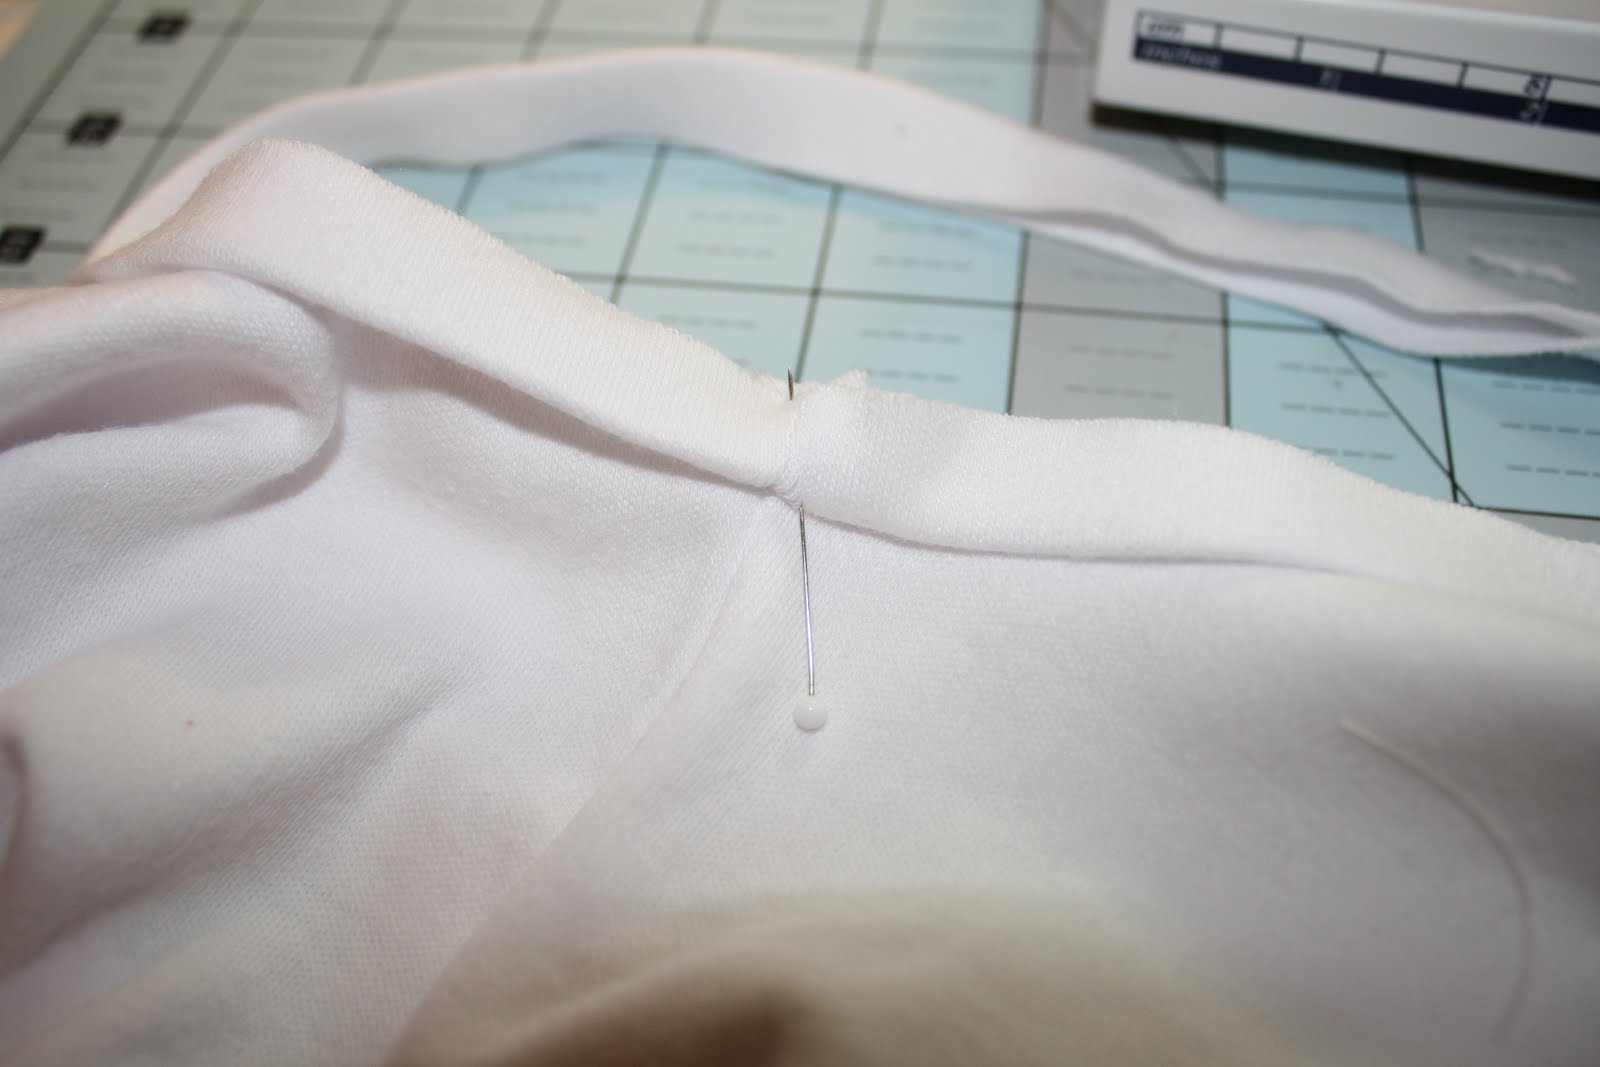
Step 5:    Attach neck trim to shirt. 
Have your shirt right side out and with raw edges aligned pin the neck trim seam to the left shoulder seam of the tank top.  (The folded edge of the neck trim is facing down and the raw edge of the tank and neck trim are aligned).  Finish pinning all the way around.  If the neck trim is a little short you can stretch as you go to make it fit just make sure it's not more than an 1" or so too short or the stretching will distort the neckline.  If the neck trim it too long you will need to unpin it and make adjustments. 


Stitch using 1/8" seam allowance.  Add a reinforcement stitch to the inside of your 1/8" seam allowance to add durability or you can serge if your lucky and have a serger.  So jealous!  Iron seam down. 


2 stitch rows to add reinforcement

Step 6:  Attach arm trim to shirt.
Pin arm trim to first arm hole lining up raw edges and arm trim seam with arm pit seam.  Pin all the way around.  Stitch using 1/8" seam allowance.  Reinforce stitch sewing 1/8" seam allowance on the inside of your first stitch.  Iron seam allowance in.  Repeat other arm. 


Step 7:  Finish bottom hem. 
I did an overlock stitch along the bottom then folded and ironed 1/2" up and stitched 2 straight stitch rows.   You can leave it unfinished as well. 


Now it's time to embellish!  My shirt turned out to be to wide at the straps so I added and secured some gather stitches.  I also wanted a little gather along the neckline so I gathered about 6" along the front middle.

To gather increase your stitch width as long as it will go and stitch 2 rows across the sleeve leaving long free ends of thread.  Next pull the thread ends and cinch up the fabric.  Tie knots by hand with the free thread ends on the inside and outside. 


To make the knit flowers you cut long strips of knit approximately 1" wide (again the stretch of the knit running along the length of the strips) and wrap it around 2 fingers 4-6 times depending on the size flower you like.  Next pass the long free end through the center and fluff the flower.  Secure it by hand stitching.  First the center back then hand stitch up through the middle working your way to the outside rows of the flower making sure all rows are secure.  Once the flower is secure hand stitch it to the shirt similar to how you would attach a button. 


Wow, I need a mani!


To add ties to the shoulders you will cut 2, 1/2" strips of knit the length you prefer (mine are12") with the stretch of the fabric running the length of the strip.  Align the center of the tie with the center of the shoulder strap and hand stitch the tie to the wrong side at the shoulder seam.  Pull ties around to the front and tie in a knot.  Trim ends at an angle.

That's it!  I hope you enjoyed!  Now it's time to show off your work!  flickr group


Pin It