HOME ABOUT ME PATTERNS/TUTORIALS FEATURED CONTACT ME

Tuesday, March 26, 2013

Messenger Bag Tutorial


Click photo to view tutorial

I recently followed my own tutorial to make a birthday present for one of our sweet friends 6th birthday.  I had originally created this pattern for the boys for a Christmas present to use as a scavenger nature study bag.  They still use those bags when they go exploring so I thought it would be the perfect handmade and recycled treasures gift for our adventurous little friend.


I made a few changes to the pattern.  I made it a little larger and used quilting fabric so I lined it with fusible fleece.  The fabric is by Sarah Jane except for the blue dots.  I believe the blue dots is an Amy Butler fabric.  For the piping around the flap I covered existing piping.  Even with the changes this bag only took about 2 hours total to create.

For the surprises on the inside we used recycled goods from the thrift store, items we found in the house, and we purchased 2 small treasures to make it complete.  Inside there is a journal, artist pencil, flower press, sun flower seeds, compass, magnifying glass, and small expandable cage.  Small treasures to help spark a desire to head outside and explore Gods beauty.  Pin It

Thursday, March 21, 2013

Organic Fertilizer using Worm Tea, Rabbit Manure Tea, and Chicken Manure Tea.

When it comes to organic sustainable gardening with the use of wood chips, it's important that you are feeding plants on a regular basis because wood chips will draw nutrients out of the soil during decomposition.  There are several ways to feed your plants and wood chips but I have found that the secret to fertilizing is use what you have or can get close by and keep it simple!


One of the least expensive and manageable sources of organic compost is vermiculture.  We raise red wigglers in Tupperware totes.  The maintenance required to care for them is to add produce scraps, add fresh newspaper or cardboard on top of scraps, drain the water so they don't drown, and keep them in the shade.  You can read more about vermiculture here.


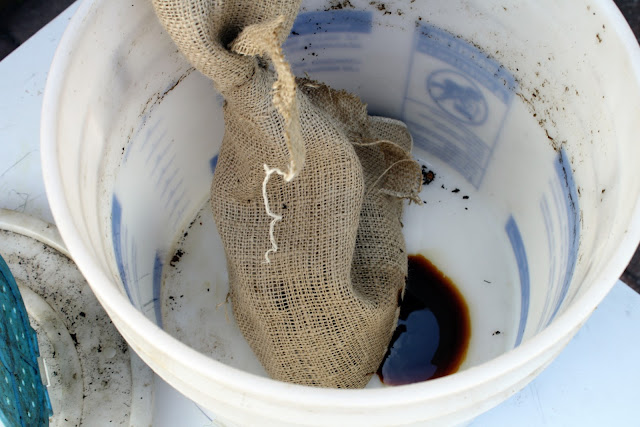
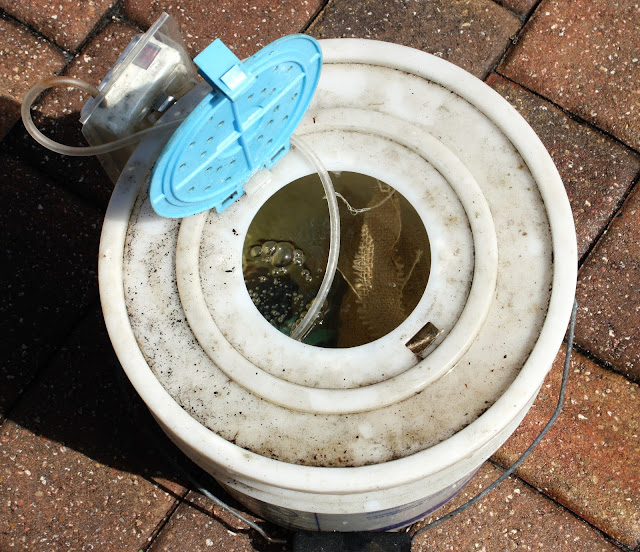
What you are trying to get from worm composting is a maximum amount of microbes and in order to get microbes to grow you need sugar and oxygen.  To make my worm tea I use a 5 gallon bucket and add about a handful of worm casting (the dirt) to a burlap bag (you can use a sock, cheese cloth, pantie hose....).  Next I pour in approximately 2 tablespoons molasses and put a source of oxygen in the bucket.  In this photo I was using our bate bucket with bubbler.  Now I use an old fish tank pump so I don't waste batteries.  Next you want to fill the bucket with water that is not treated.  If you have chlorinated water let it sit for a day outside before adding casting.  Once everything is added you turn on the pump and let it sit for 48 hours.  If it's cool out put it in a sunny spot.  If it's really warm out place the bucket in the shade.  After 48 hours you can put it in a garden sprayer or pour it along the base of plants.  I like to spray with worm tea so the microbes cover the foliage.  The microbes will handle fungus problems and can deter bugs from munching on leaves. 
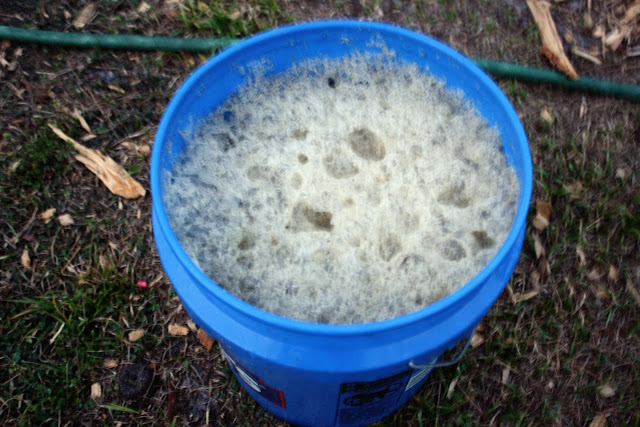


I also make compost tea out of rabbit manure and chicken manure.  My favorite source for fertilizer is rabbit manure.  It's so simple!  Rabbits usually use 1 or 2 spots in their cage to go to the bathroom making it easy to collect manure.  Rabbit manure also breaks down very quickly and is not too "hot" for plants, meaning it won't burn plants by adding it to soil without decomposing first.  I simply add the manure to a bucket of water, stir, then pour over plants.  I allow the tea to go on the foliage as well as the soil since it's a milder form of fertilizer.

My other source of fertilizer comes from the chickens.  Chicken manure that is not decomposed first can burn plants so I have found the best way to make chicken manure tea is to grab a handful of composted manure from the compost pile and place it in a bucket with water.  Next I add a handful of fresh manure directly from the coop.  I stir it until dissolved and pour a small amount to the base of plants.  This is a much stronger fertilizer so I don't recommend pouring directly on leaves and it's important not to over fertilize. A 1/2 cup full at the base of mature plants and an even smaller amount around newly sprouting plants has worked well for me. 

How do you fertilize your garden?  I would love to learn ways you have had success!  Pin It

Tuesday, March 12, 2013

What to do with icicle radish.


Earlier this winter I pulled a few root veggies up and had no idea what they were.  I am constantly planting seeds but I poorly document everything I plant.  I have been more interested in getting the gardening space established and vegetables and fruits growing to keep the weeds under control.  I thought I had planted radish from some seeds I had stored but then this white carrot looking root came popping out of the ground. 


Someone suggested it was daikon but after doing a little more research I realized I was growing Icicle radish.  I was a little disappointed at first.  They are bitter raw and I had no idea what to do with them. I also have a garden full and they grow fast so I was worried I had wasted energy on a vegetable we would not use.  I had cooked the first two I harvested in the crock pot with a whole chicken, wild rice, and collards and carrots from the garden.   The icicle radish gave the dish a surprising mild peppery zing and was quite delicious.  It's hard to describe their unique taste.  It's not peppery tasting to the tongue but will leave your belly with a very refreshing "peppery" feeling after eating them. 


Now I'm hooked on them!  They only take up a small space in the garden, grow really quickly, have the texture of a potato, and require no maintenance.  The greens are also very healthy, more than the radish actually, and taste great cooked.  I'm sure there are many recipes online but I prefer the easy route of just sauteing them in a little olive oil or homemade chicken broth and salt.  I chop up the radish and the greens into small bites and cook until the bitterness is gone.  It can take about 15 minutes for them to get savory.  The greens hold their bitterness a little longer but it does cook out.  If I'm not sauteing with an onion or anything else I sometimes add a dab of molasses to help get rid of the bitterness.  When cooking with other vegetables the molasses is not necessary.  You will want to cut off any top portion of the radish that was exposed to sun and has turned green. 

After sauteing I serve them up as a side dish.  They are also great if you pour fresh eggs on top and pop in the oven.  My next plan is to add them to beef stew since they have the nice texture of a potato but not all the calories.  The possibilities are endless now that we have developed a taste for them!

I would love to hear how you cook up your icicle radish!


Pin It

Friday, March 8, 2013

Tank top to dress tutorial with ruffled waist.

Click photo to access tutorial
This is one of my new favorite dresses to wear!  I've made 3 dresses for me so far using this pattern I came up with and absolutely love them all!  There are a few reasons this style dress is my favorite.  1st, you can recycle old tanks and tees that may no longer be long enough to cover the mid-waist or have stains on the bottom.  You can also used recycled curtains, sheets, or table cloths for the skirt. 2nd, It's super comfy!  These dresses are now my go-to house dress because I can clean, garden, and do house work in them and still look presentable if someone comes to the door or if I have to run the kids to violin or art class.  3rd, Once you get the hang of the waistband they are super easy to make!


The tank top for this one was an old tank from the dresser and the fabric for the skirt is 100% organic cotton but I don't remember from where!  I purchased it online and did the happy dance when it arrived but then it sat in the fabric staff for several months and now the details have long left my memory.  The excitement of this natural fabric and earthy pattern have not however. 


This is another one of the dress styles I made.  These photos are from our Classical Conversations group taken by a friend.  I decided to go matchy matchy with Madeline.  With this one I shortened the width of the waist to give it a more formal fitted look. 


 Click the top photo to see the tutorial and I hope you enjoy it as much as I have! 

Happy Sewing!

Pin It

Friday, March 1, 2013

Clean food, organic living, real food, whole foods......what ever you call it, we are doing it!

Every month we work towards a simpler life.  One where we can self sustain, at least a little, and rely less on the outside world and more on each other.  I don't have a written check list of what we want to do each month but I have a mental check list with lots of things and as opportunities arise that fit the need I take them.  It's cold right now.  Not blistery snow cold but cold enough that I can visit my garden daily only to find that it's the same as the day before.  My plants are patiently waiting for spring while I impatiently stare and pace.
apple sauce


Wilting spinach salad become frittata

The cold front has left me available for other projects and recently I have decided that it's time to go "all in" in regards to food.  I have no idea what to call it.  It seems there is a different name every time I research the topic.  Real food, clean food, organic living, whole foods.....  It's all so confusing.  Our eating habits have been good for a long time but I was still relying on boxed goods and processed breads to provide nourishment for my family.  Organic boxed goods, but still with a list of ingredients that I can't pronounce and more than I can count on one hand.  Now I'm having a go at saying NO to all processed foods.  This doesn't mean that we will never enjoy eating out on occasion or cupcakes at a party but the majority of the food we consume will be unprocessed.  It's been just over a week so far, so I'm no expert, but I will say that it's drawing me closer to God.  I "get" food more now.  I see Gods plan for how we should nourish our bodies by working with simple, raw foods.  When I'm hungry I can have junk food still but I have to make it from scratch.  That means I must really want that snack and by the time I'm done I've earned it.  It's not easy, it's valuable.


I have also snuck in some simple sewing projects lately.  I'm up-cycling old t-shirts and tanks into cute dresses.  There are several tutorials out there on how to do this but not one with my cute ruffled waist band.  I'm hoping to post the tutorial this weekend while it's cold and my garden is busy NOT growing. 


Happy baking, growing, sewing, and hopefully loving life!

Pin It